Pop Menu Magic in a server-side Include
This tutorial will show you how to convert an existing Pop Menu Magic menu into a server-side include. The illustrations in this tutorial depict a vertical menu using the Basic menu style.
Creating the Include File
The include file is the external file that contains the information that you wish to include in your actual web pages. You'll create a new folder, an include file inside that folder, then you'll copy the menu markup from an existing web page and copy it into the new include file.
-Open your files panel (Window > Files)
-Right Click (Control-Click) the root of your site and choose New Folder.

-Name the new folder includes.
-Create a new file within the includes folder and name it pmm_include.htm.
-Open the page that contains your actual menu. For this tutorial, we'll assume that this page is index.htm.
Changing the File Extension to SHTM
For your include to work on your server, you'll need to change your file extension so that index.htm becomes index.shtm.
Note: For more information on file types and server technologies, see the Overview page.
-Open index.htm (the page that contains your menu).
-Choose File > Save As.
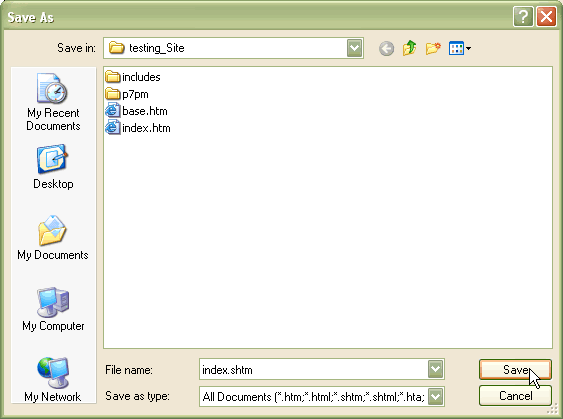
-For File name, type in index.shtm.
-Click Save.
Copying the Menu Markup
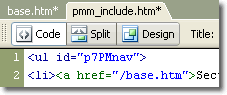
-In index.shtm, switch to Code View
-Find the menu markup (it begins with <ul id="p7PMnav">) and place your cursor anywhere inside the menu code.
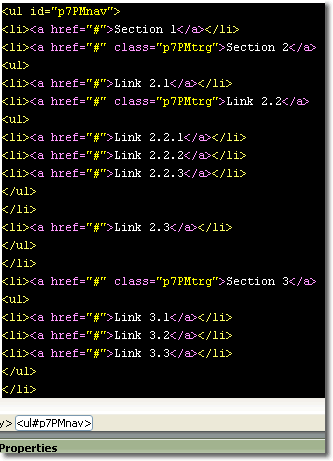
-Find <ul#p7PMnav> on the Tag Selector bar, which runs along the bottom edge of Dreamweaver's window ( just above the Property Inspector) and click to select it.
The entire block of menu code will highlight to indicate your selection.
-Choose Edit > Copy
-Open pmm_include.htm
-Switch to Code View
Include files must only contain the code you wish to appear in your actual web page. Your page already contains a DOCTYPE, an <html> tag, a <head> region and a <body> tag. You will remove all of this code and replace it with the menu markup you copied from your actual page.
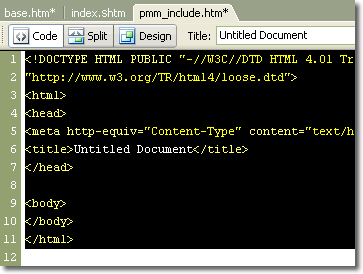
-Select all of the code in your pmm_include.htm file
-Choose Edit > Paste.
Your menu markup replaces the original code.
Converting Links to Site Root Relative
When viewed on the internet, your server will insert the contents of your include file into your actual web pages. In all likelihood, your pages will reside in various folders within your site. If you use Document Relative paths (Dreamweaver's default), then your menu item links will always be relative to your include file, which is in its own folder. Your links will not work unless the page happens to reside in the includes folder. The only way to ensure that your links are always going to work, no matter what the page, you must set them to be relative to the root of your site.
Note: The browser attempts to process the links that come from your include file, as if they were relative to the page that contains them ( index.htm) and they will fail because the link is actually relative to pmm_include.htm
-In pmm_include.htm, Click the PMM icon to open the Pop Menu Magic UI
Since there is nothing but menu markup in your include file, the system will not know what style or options are assigned to your menu. That's expected behavior under the circumstances - but you can still edit the links in the Pop Menu Magic User Interface.
-Click OK to close the warning dialog.
-Select a menu item. In this example, we selected Section 1.

-Click the Browse... button.
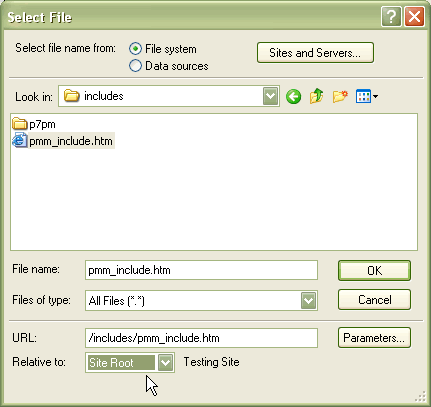
-The Select File To Link dialog will open.
-Browse to the file within your defined site that you wish to link to. In this example, we've selected a file called base.htm in the root of our defined site: testing_Site. Your site will, of course, be different.
-Select the file you wish to link to.
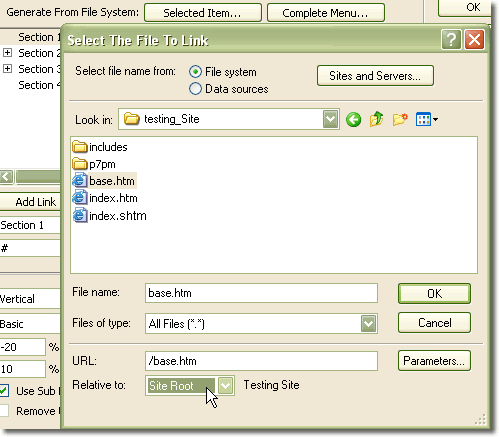
-In the Relative to list, choose Site Root.
The URL value will change to include a leading forward slash, which indicates the path to your linked file is now relative to the root of your site.
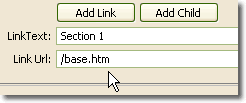
-Click OK to close the Select File To Link dialog.
The Link URL box in the PMM UI will reflect your new link and its site root relative path.
-Repeat the above steps to change all of the links in your menu to site root relative.
-Click OK to close the PMM UI when you're done converting all of your links.
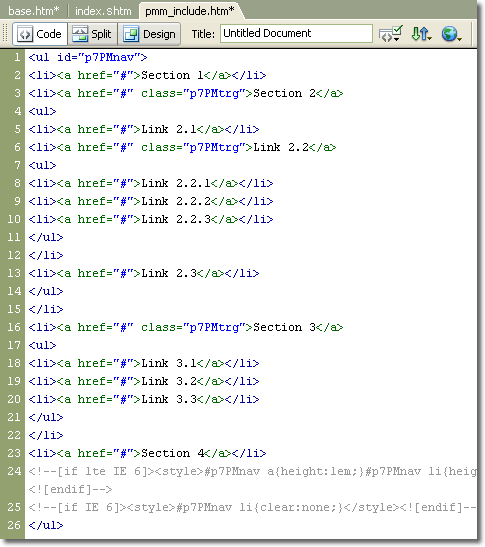
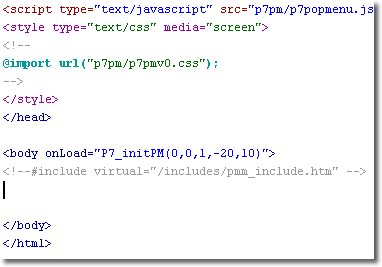
Notice that the PMM system inserted a JavaScript link, style tags, and a body onLoad event handler. You will need to delete these before saving your include file.
-Select all of the code that comes before <ul id="p7PMnav">.
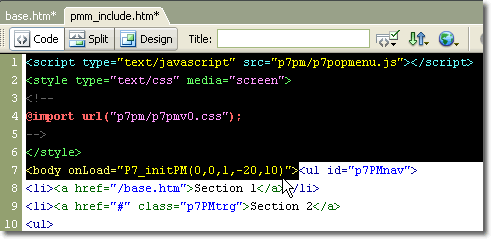
-Delete the selected code so that your markup begins with <ul id="p7PMnav">.
-Save the include file.
Inserting the Include
-Switch back to index.shtm.
If your menu markup is not still selected, go ahead and select it again-
-Find the menu markup (it begins with <ul id="p7PMnav">) and place your cursor anywhere inside the menu code.
-Find <ul#p7PMnav> on the Tag Selector bar, which runs along the bottom edge of Dreamweaver's window ( just above the Property Inspector) and click to select it. The entire block of menu code will highlight to indicate your selection.
-Press your Delete key to delete the markup.
-Dreamweaver MX 2004 users choose Insert > HTML > Script Objects > Server-Side Include.
-Dreamweaver MX users choose Insert > Script Objects > Server-Side Include.
The Select File dialog will open.
-Choose Relative to: Site Root
-Click OK.
-Dreamweaver will insert a Virtual Include comment in your code.
About Virtual Includes
Virtual Includes are always used with Site Root Relative paths. If you forgot to choose Site Root in the Select File dialog, Dreamweaver will insert a File Include. To correct this-
-Click the Refresh button on your Property Inspector

-Place your cursor anywhere inside the Include comment
Your Property Inspector will change to show options for your Include
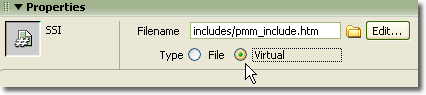
-Select the Virtual Type radio button.
-Click the folder icon to browse to and reset the path to your include file.
-Select Site Root from the Relative to list.
-Click OK.
Your Filename path now has a leading forward slash indicating it is Site Root Relative.

-Switch to Design View.
Your menu will be there. If it is not, make sure you followed the instructions in the Overview page of this tutorial to set your Dreamweaver Preferences to show Include files.
Previewing Locally
In Dreamweaver MX 2004, you can preview pages that contain includes and Dreamweaver will display the included content using a special temporary file. To see the included content, Dreamweaver must be set up to Preview using a temporary file. To make sure this feature is enabled-
-Choose Edit > Preferences.

-In the Preview in Browser category, check the Options box to Preview using temporary file.
-Click OK.
Note: Dreamweaver can only generate the included content for the current page. If you click a link on the previewed page and open another page, the include will not be rendered. This is normal behavior for Dreamweaver. All pages will work as expected on the internet.
Editing "Included" Menus
If you attempt to open the PMM UI in a page that contains an include, the system will detect that you are using an include and present you with a reminder that the menu is locked inside an include and that to edit it, you must do so in the include page.
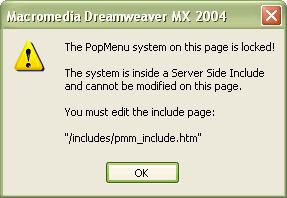
Click OK to close the dialog and open your include file to make changes to your menu.
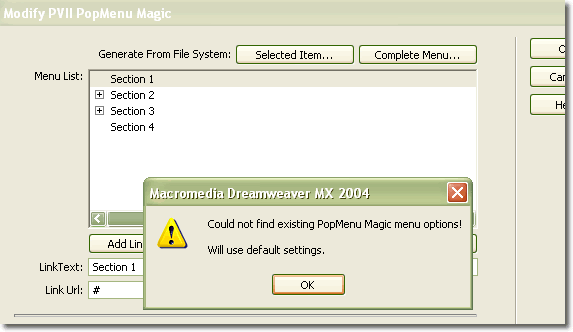
When you Modify the PMM menu in the include file you will most likely get this warning when you first open the Modify interface:
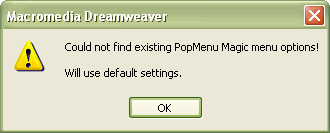
This happens whenever the system cannot find the PMM Initialize behavior on the page. Click OK. The Modify interface will be set to the default menu type and style settings since it could not find any on the page. Be sure to select the Menu Type and the Menu Style, along with any other custom options when the Modify interface opens to assure that the system will write the correct menu markup back to the page.
Creating additional pages
To create additional pages, make copies of index.shtm and rename the copies.
-Open index.shtm.
-Choose File > Save As.
-When the Save As dialog opens, change the name in the File Name box. For example, change index.shtm to products.shtm.
Note: If you are using a Dreamweaver Template, you can insert an include into the DWT file. Just remember that all of the pages attached to your Template will need to be changed to the shtm file extension.
Other Types of Includes
If you have access to and would like to use a server technology such as ASP, ASP.NET, ColdFusion, or PHP, you'll need to change the file extension of index.shtm to one of the following:
- index.asp
- index.aspx
- index.cfm
- index.php
Your include file extension (pmm_include.htm) does not need to be modified unless the include file will be containing dynamic server code.
You will also need to change the syntax of your include comments. While you should consult your server hosting company or network administrator, here are examples of how your include comments should be written:
ASP and .NET
ASP and .NET includes use the same syntax as plain SSI:
<!--#include virtual="/includes/pmm_include.htm" -->
ColdFusion
<cfinclude template="/includes/pmm_include.htm">
PHP
<?php require_once('/includes/pmm_include.htm'); ?>
Closing thoughts
Pop Menu Magic was designed to make it as easy as possible for you to work with site management techniques such as Includes. Even after deploying an include, you can still use the Pop Menu Magic User Interface to add or delete links, add sub-menus, re-order your menu items - in short, you do not give up the power of the PMM UI when you use server-side includes!
Next: Home