MASKS: Alpha Masks
Alpha masks affect the visibility of underlying objects. They are made with grayscale gradients that tell Fireworks how much to blend the image pixels with the pixels of the background it sits on. If you want to fade one image into another, or make part of an image invisible, you use an alpha mask. The white point of the alpha mask is what determines the transparency of the underlying object in Fireworks. What that means is that the pixels of the image being masked are most visible (opaque) where the pixels of the masking gradient are closest to pure white (255). Alpha masks are the type of masks most commonly used in PVII products. In this lesson, you'll practice on the masthead of the PVII Victoriana Learning Pack.
- Choose File > Open
- Browse to the PVII_PhotoMagic directory on your hard drive.
- Locate the victorian.png file and click on it to select it.
- Click on Open
- Open the Layers panel (Window > Layers).
- Click on the options menu expander (the wavy line icon) at the top, right of the panel group, and select Unlock All.
TIP: Any image you use to replace the original image in a PVII product should fit within the slicing guide of the image being replaced.
The first thing you may have noticed about the victorian.png file is the bright green slicing guide that covers its left half . It is your cue to the size of the image that can be used to replace the original one. Before turning it off to work through the rest of the tutorial, drag a guideline to the right edge of the slicing guide. Once that's done,
- Open the Layers panel (Window > Layers).
- Hide the Web layer by clicking on its eye icon.
- Hide the Logo layer
- Hide the mask group in the Header Background layer.
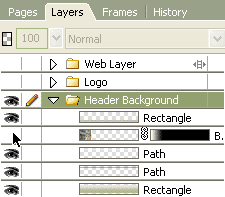
Figure1: Hiding the mask group
Next you'll import the image that will replace the existing masked one.
- Choose File > Import
- Browse to the PVII_PhotoMagic directory on your hard drive.
- Locate the old_photo.jpeg file and click on it to select it.
- Click on Open.
- Click somewhere on the masthead background image to drop the imported image.
- Align the right edge of the image with the guideline you added earlier.
- Align the bottom edge of the photo with the bottom edge of the "navbar" object.
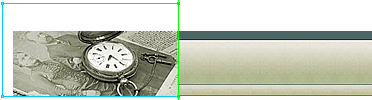
Figure2: The photo properly aligned (shown at 1/2 actual size)
To begin creating the mask group,
- Click in the Stroke Fill Color box on the Tools panel and set the stroke color to none.
- Click on the Fill Color box on the Tools panel, and then on the Fill Options button.
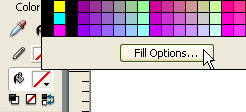
Figure3: The fill options button
In the Fill Options editor,
- Set the Fill type to Gradient
- Set the Gradient style to Linear
- Select the White/Black preset
- Set the edge type to Hard
- Press Enter to close the Fill Options editor.
To create the masking object,
- Select the vector Rectangle tool and drag out a rectangle that covers the photo. The rectangle automagically filles with the gradient you set up.
- With the rectangle still selected, click on the Pointer tool (black arrow).
- Click on the round handle of the Gradient adjustment bar and drag it to the left edge of the document.
- Pass the pointer tool over the Gradient Adjustment bar until you see the Rotate cursor.
- Rotate the Gradient Adjustment bar clockwise, until the bar is in the horizontal position.
- Grab the square handle of the Gradient Adjustment bar and drag it to the right, until it reaches the guideline.
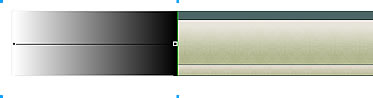
Figure4: The adjusted gradient
To create the Mask group,
- Press Shift, and in the Layers panel select the Rectangle and bitmap objects.
- Choose Modify > Mask > Group as Mask.
Optional steps:
- To Adjust the width of the faded pixel area, click on the thumbnail of the masking rectangle in the layers panel. It will become highlighted in bright green.
- Grab the square handle of the Gradient Adjustment bar and drag about 40 pixels to the left.
- To adjust the position of the image in the mask group, click on the link icon between the two thumbnails of the mask group.
- Use your arrow keys to move the image around.
- When you are satisfied with the position of the image, click between the two thumbnails of the mask group to re link them.
To finish,
- Move the navbar image on top of the mask group by choosing Modify > Arrange > Bring to front.
- Un hide the Logo layer
- With the logo selected, click on the Add Live Filter button on the Property inspector [+] and choose Shadow & Glow/Glow.
- Select a color from the middle of the background image.
- Set the Glow width to 5, and then press enter to accept the changes and close the Glow editor.
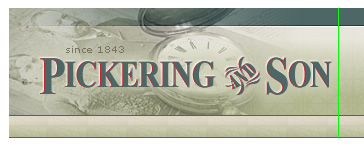
Figure5: The Alpha mask group
That's it! Good job. If this were an actual PVII product PNG file, its export options would already be set up. All that's necessary to add the new image your page in Dreamweaver is to choose File > Export. It doesn't get easier than that.