Pixel tiles
Background images are an easy way to punch up your website with color, texture, and light. The exercises that follow will serve as an introduction to creating Pixel background tiles. If you'd like to follow along, click on the ZIP icon to download the supporting files, and then create a new folder on your hard drive. Label the folder My Tiles. Unzip the supporting files into your new folder.
Note: This tutorial is the first in a series. The supporting files are for use with the entire series.
About pixel tiles
Pixel tiles are called pixel tiles because that's how you make them-one pixel at a time. First you'll create a tile with a simple lattice pattern using the classical pixel technique. Then you'll learn how to cheat with printer's ornaments to create more elaborate patterns.
Making a lattice pattern
- Choose File > New.
- Enter 11 Pixels for Width and Height.
- For Canvas color, click the Custom radio button.
- Click in the Color fill box to open the Swatches pop-up.
- Use the built in color picker to select the dark green, #006666 swatch.
- Click OK to close the New Document dialog box.
A grid will make laying the pixel pattern much easier. To create the grid,
- Zoom the canvas to 3200%.
- Choose View > Grid > Edit Grid.
- Change the grid color to light blue.
- Check both Show Grid and Snap to Grid.
- Set the grid size to 1 pixel by 1 pixel.
- Click OK to accept the changes and close the grid editing dialog box.
Figure 1: 11 pixel square with grid (shown at 1600%)
You'll use the Vector line tool to lay out the pattern.
- Click on the Vector line tool to select it.
- Set the Stroke color to black.
- Click in the top, left square of the grid to lay the first black pixel.
Instead of describing where to add each pixel, I'll supply a chart.
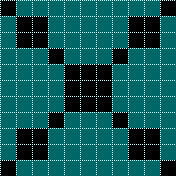
Figure 2: Pattern chart
Once you've finished setting up your pattern, it's time to export.
- Open the Optimize panel. [Window > Optimize].
- Set the export type to GIF > Exact, No Transparency.
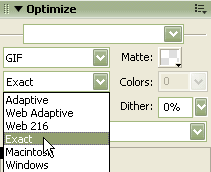
Figure 3: Setting the optimization values
To Export your tile
- Choose File > Export.
- Browse to the My Tiles folder you created at the beginning of this tutorial.
- Give the tile a name.
- Choose Export: Images only.
- Click on Export to accept the changes and close the Export dialog box.
To test the tile, you'll use it as a Pattern fill in a Rectangle. Open a new 300 pixel by 300 pixel document window.
- Select the Vector Rectangle tool and draw a 300 pixel by 300 pixel rectangle.
- Center the rectangle by entering zeros in the X and Y boxes in the Property inspector.
- With the rectangle selected, click on the down arrow of the Fill Category selector in the PI (Property inspector) and choose Pattern.
- Scroll to the bottom of the Pattern menu until you find the word "Other."
- Click on Other to open the Locate File dialog box.
- Browse to your new tile, and then select the tile by clicking on it.
- Click open to accept the changes and close the dialog box.
Your rectangle fills instantly with the tile.

Figure 4: A test of the new tile
Here's a cool trick that enables you to use the same background tile but change the background color by clicking on a link. When exporting your tile,
- Make sure you set the export format to GIF, and the Indexed Palette to exact.
- Choose Index transparency to remove the green background color of the tile.
Only the black pixels are exported. Take care to use this technique with hard edged, aliased pixel tiles only. It will not work properly with anti-aliased images. The underlying background color of your page will show through the transparent parts of the tile. The box below is a DIV to which we've assigned our tile as a repeating background image. Click the links in the box to change the box's background color, which will show through the image.
Example
Making an ornamental tile
Some of the complex background tiles you see on the websites of bed and breakfast hotels are created using the classical pixel technique. These beauties, resembling Victorian wallpaper, probably required many hours to develop. If you are like me, you just don't have the time available for an element you can only use for a single project. Printer's Ornaments to the Rescue! Printers ornaments are small embellishments often included in large type families. To keep things simple, I've included some bitmap ornaments you can use in the next section of our Pixel backgrounds tutorial.
- Choose File > Open.
- Browse to the ornaments.png file in your My Tiles folder.
- Click on the PNG file to select it, and then on Open to accept the changes and close the Open dialog box.
- Click on the ornament I've colored red, and then choose Edit > Copy.
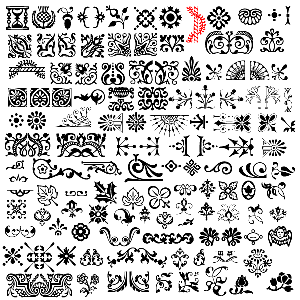
Figure 5: A collection of bitmap ornaments
- Open a new 100pixel wide by 72 pixel high document window with a black background.
- Paste the copied ornament into the new window, and if necessary, center it.
- With the red ornament selected, double click on the Color Fill line in the Edit Live Filters box in the PI.
- Click on the Color fill box of the editor to open a Swatches pop-up.
- Change the color fill from red to white.
- Click on an empty spot in the document window to close the Color Fill editor.

Figure 6: A Printer's ornament tile
To Export your tile
- Open the Optimize panel. [Window > Optimize].
- Set the export type to GIF > Exact, No Transparency.
- Choose File > Export.
- Browse to the My Tiles folder you created at the beginning of this tutorial.
- Give the tile a name.
- Choose Export: Images only.
- Click on Export to accept the changes and close the Export dialog box.
You'll test the tile almost the same way you tested the first one. Open a new 300 pixel by 300 pixel document window. Let's make the canvas a soft, gray-green.
- Click in the Fill color box in the New Document window to open a Swatches pop-up.
- Double click on the octothorpe (#) in front of the HEX number in the text box at the top of the pop-up.
- Enter the number #99A189.
- Press Enter to close the Swatches pop-up.
- Click Ok to close the New Document dialog box.
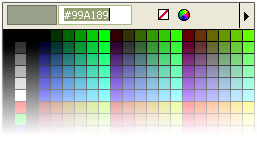
Figure 7: Entering a new HEX number
- Select the Vector Rectangle tool and draw a 300 pixel by 300 pixel rectangle.
Make sure the rectangle is centered over the canvas by entering zeros in the X and Y boxes in the Property inspector. We'll make the rectangle a pale sage green.
- Click in the Fill color box in the New Document window to open a Swatches pop-up.
- Double click on the octothorpe (#) in front of the HEX number in the text box at the top of the pop-up.
- Enter the number #C8CFB7.
- Press Enter to close the Swatches pop-up.
- Click Ok to close the New Document dialog box.
To add the tile,
- With the rectangle selected, click on the down arrow of the Fill Category selector in the PI (Property inspector) and choose Texture.
- Scroll to the bottom of the Texture menu until you find the word "Other."
- Click on Other to open the Locate File dialog box.
- Browse to your new tile, and then select the tile by clicking on it.
- Click open to accept the changes and close the dialog box.
The tile automagically fills the rectangle. We've lost our lovely background color,
however. To get it back, click in the Transparent box below the Texture menu in the PI.

Figure 8: Testing the new tile
We've learned that by using the tile as a texture, we can change its background and foreground colors at will. To use the texture to create a background tile for an HTML page, draw a rectangle the exact size of the tile, 100 pixels wide by 72 pixels high. Add the tile as a texture, color it as you wish, and then export.
See it live
See the ornamental pattern as a page background
That's a wrap. Happy tiling!