Gradient tiles with shadow
Background images are an easy way to punch up your website with color, texture, and light. The exercises that follow will serve as an introduction to creating Gradient background tiles with a shadow effect. If you'd like to follow along, click on the ZIP icon to download the supporting files, and then create a new folder on your hard drive. Label the folder My Tiles. Unzip the supporting files into your new folder.
Note: This tutorial is the third in a series. The supporting files are for use with the entire series.
About gradient/shadow tiles
A gradient tile seen frequently these days is one that creates a shadow on either side of a centered, fixed width page. It helps to focus the viewer's attention on the content, rather than the empty space on either side of it. It's one of my favorites, and it is dead simple to create.
Creating the background
To create the background of the tile,
- Open a new 1900px wide by 20px high document window.
- Set the color to #B8AF8D
Creating the shadow
To create the shadow,
- Drag out a 760px wide by 30px high rectangle.
- Set the color to #B8AF8D.
- Open the Align panel (Window > Align).
- Click on the Align to canvas button, and then on the Align Vertical Center and Align Horizontal Center buttons.
- With the rectangle selected, click on the Add Effects button [+] in the PI (in FW 8, the Live Filters button).
- Choose Shadow & Glow > Glow.
- Set the Glow color to #333333, the Opacity to 40%, the softness to 9.
- Press Enter to close the Glow editor.
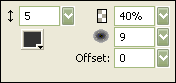
Figure 16: Setting the glow properties
- Export in JPEG format using the default settings.
Using the tile on your page
To use the tile on your page, set the margins to zero, set the background tile to repeat on the Y axis, and center it. Your style should look like this:
<style type="text/css">
<!--
body {
margin-left: 0px;
margin-top: 0px;
margin-right: 0px;
margin-bottom: 0px;
background-color: #B8AF8D;
background-image: url(shadowT.jpg);
background-repeat: repeat-y;
background-position: center;
}
-->
</style>
Viewing the tile on a real page
I've created a page using the striped background tile as a background for the content wrapper, added the logo, and then used the shadow background image as the background image for the page. Here's what the shadow looks like.

Figure 17: Left side of the finished shadow
Combining a patterned background
So what if you want a background shadow and background pattern? You can do that too. To try it, first hide the rectangle you added to the shadow background tile.
- Change the canvas size to 1900px wide by 28px high.
Why 28 pixels high? Because that's the height of the texture image you will be using. For horizontal strip tiles, the pattern has to tile from top to bottom. For vertical strip tiles, the pattern has to tile from side to side.
- Change the canvas color to white.
- Draw a 1900px wide by 28px high rectangle across the canvas.
- To position it, type 0 into the X and Y boxes on the PI and press enter.
- Fill the rectangle with black.
- With the rectangle selected, click on the down arrow of the Texture selector on the PI and scroll down the list until you find the word Other.
- Click on Other to open the Locate File dialog box.
- Browse to the texture.gif file in the My Tiles folder, select it, and then click on Open.
Zip! The texture fills the rectangle.
- Reduce the rectangle opacity to 90%.
- Unhide the shadow rectangle and change the Glow color to Black.
- Change the Glow opacity to 100%.
- Export in GIF format, at 128 colors with full dithering.

Figure 18: The patterned tile with shadow.
Add the patterned, shadow tile to your HTML page exactly the same way you did the plain shadow tile.
Viewing the finished background
Your page should now look like this:
Happy tiling!