peopleHarmony User Guide (October 2018)
Installing Harmony
Extension installer files come in 2 formats: MXP and ZXP. MXPs are supported by Extension Manager versions MX, MX2004, 8, CS3, CS4, CS5, CS5.5 and CS6. ZXP is supported by versions CS5.5 and higher. Version CC and higher have dropped support for the MXP format. To continue to support all Adobe customers, regardless of version, we include both the classic MXP and the new ZXP versions.
Dreamweaver CC 2015 (and higher) Extension Installation Information
As of CC 2015, Adobe has ceased to support its own Extension Manager. Use the PVII Extension Manager for Adobe Creative Cloud...
PVII Extension Manager for Adobe CC
( Windows and Mac)
Overview:
One Design: All Devices: Perfect Harmony"
PVII Harmony is a responsive page layout tool that leverages the full power of the CSS Flexbox specification. Months of R&D have yielded a tool that gives you access to all of Flexbox's power in a simple to use automated interface running inside Dreamweaver, without having to worry about browser quirks. Harmony is a definitive solution—a bridge to the future of web page design, a new way forward that you can use today, on new or existing pages.
Harmony works seamlessly with Dreamweaver templates (dwt files).
How it works
Harmony is a flexbox tool designed and coded for laying out web pages. You can start with a blank page or add one or more Harmony instances to an existing page to augment its design.
Row and Columns
The Harmony interface allows you to set a width-basis for each column in your construct. Width-basis is what the Flexbox specification uses to allocate width.
Note: The actual CSS property is called flex-basis. We use width-basis only in the Harmony interface... for clarity.
Consider a Harmony instance where you have 3 columns defined. You set flex-basis to 25% for the first column, 50% for the second, and 25% for the third. The total equals 100%. Simple, right? This is what you get:
Width-basis: 25%
Lorem ipsum dolor sit amet.
Width-basis: 50%
Note: This Harmony instance uses the Box-Separation and rounded corners options. Mei ex quodsi inciderint, quo ad quas deleniti definitionem, vis no wisi graecis offendit.
Width-basis: 25%
Lorem ipsum dolor sit amet, ne sea vocent.
Constraint-Free Design
But Flexbox does not work like traditional floated layouts. Your columns do not have to total 100%. The Flexbox spec works with algorithms that allocate width logically. The browser looks at the width-basis you set for each column, keeping a sub-total as it loops through all of the columns in your Harmony container. If the aggregate width of all your columns exceeds 100%, a new row is created, and this process continues until all of your columns are displayed. Consider this example, where we change the width-basis of the third column to 100%:
Width-basis: 25%
Lorem ipsum dolor sit amet.
Width-basis: 50%
Note: This Harmony instance uses the Box-Separation and rounded corners options. Mei ex quodsi inciderint, quo ad quas deleniti definitionem, vis no wisi graecis offendit.
Width-basis: 100%
Lorem ipsum dolor sit amet, ne sea vocent.
The three columns above have a combined width-basis of 175%. Since that total is greater than 100%, the third column is displayed on a second row. In a floated layout, this would cause problems, because the first two columns would fill only 75% of the top row. Flexbox, however, works differently. It scales the first two columns, proportionally, until they fill the entire row, ensuring perfect symmetry... perfect design harmony.
Algorithmic Wonders
So, rows are built using algorithms that proportionally scale columns according to their assigned width-basis, until a row is filled. If that's true, we can do another version of the previous example, and instead of setting the third column to 100%, we can set it to 26%—pushing the aggregate width to one single percentage point over 100—without changing the rendered result:
Width-basis: 25%
Lorem ipsum dolor sit amet.
Width-basis: 50%
Note: This Harmony instance uses the Box-Separation and rounded corners options. Mei ex quodsi inciderint, quo ad quas deleniti definitionem, vis no wisi graecis offendit.
Width-basis: 26%
Lorem ipsum dolor sit amet, ne sea vocent.
Amazing, isn't it?
Accessing the Harmony Interface (UI)
The Harmony interface is your command center. It's simple, straightforward layout will allow you to craft cutting edge web pages, or parts of web pages, in seconds.
To access the UI, place your cursor on your page where you want to create your Harmony structure. To open the UI, locate and click the Harmony icon your Insert Bar or Panel inside Dreamweaver:
Insert Bar
Choose the PVII tab (or the PVII category if your insert bar is configured with a drop-down menu)
![]()
The Harmony icon is the last one in the screen capture above.
Insert Panel
Choose the PVII category from the drop-down list at the top of your Insert Panel.
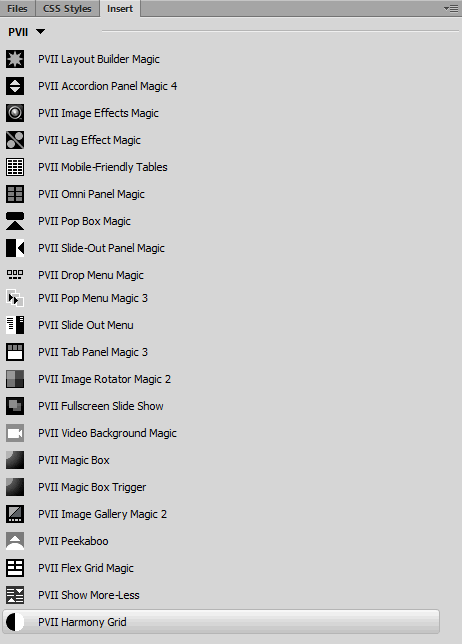
The Harmony icon is the last one in the screen capture above.
Note: If you can't find your Insert Bar or Panel, you probably hid it at one point. To access it, choose Window > Insert from the Window menu along the top of Dreamweaver.
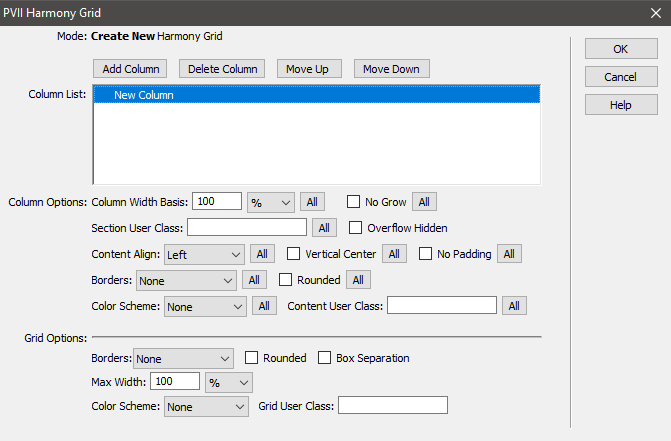
The Harmony UI will launch in the appropriate mode. If your cursor was positioned in a blank area of the page, and outside any other Harmony instance, the UI will open in Create New Harmony Grid mode.
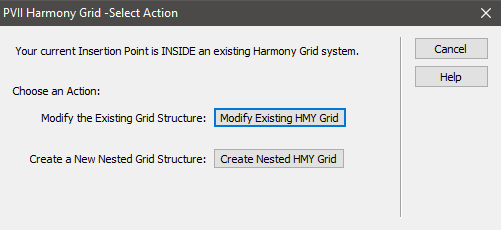
If your cursor is positioned inside an existing Harmony instance, you will see an intermediate UI that asks if you'd like to Modify an Existing HMY Grid or Create a Nested HMY Grid.
The Help Button
The Help button in any of the Harmony UI screens will open this page online, assuming you are connected to the internet.
Interface Options and Settings
Let's go over the UI, and how all of the features work. To do that, let's work with a screen capture of the UI in Modify mode:
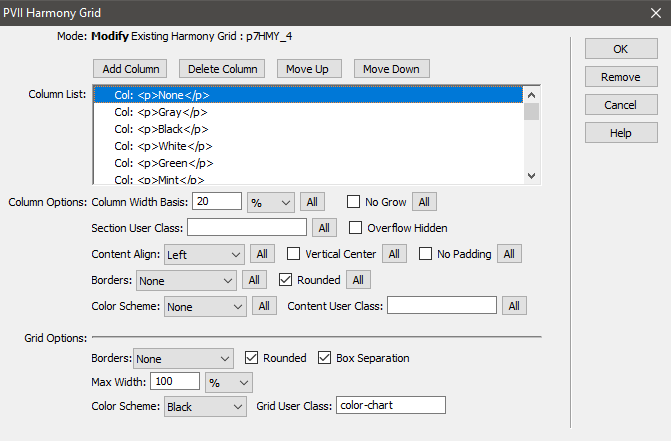
The Column List shows each of the columns in your Harmony structure. Above the list is a row of command buttons, allowing you to Add, Delete, or move your columns Up and Down.
Column Options
These options apply to the column currently selected in the Column List.
Note: once you enter one or more options for a column, subsequent columns will inherit those options. This is a convenience feature and you are free to select different options and settings for each column individually.

Column Width Basis
Width basis can be entered as a percent or in pixels.
Harmony layouts do not work like traditional floated layouts. Your columns do not have to total 100%. The Flexbox spec works with algorithms that allocate width logically. The browser looks at the width-basis you set for each column, keeping a sub-total as it loops through all of the columns in your Harmony layout. If the aggregate width of all your columns exceeds 100%, a new row is created, and this process continues until all of your columns are displayed.
Tip: After entering a width basis for your column, you can click the All button to assign that width basis to all columns in your Column List.
No Grow
Enabling this option (it is disabled by default) sets the flex-grow property to zero (no grow) for the selected column.
Column: No Grow
This column will remain 200 pixels wide until all columns linearize at smartphone width.
Column 2
This column has a width basis of 25%. The No Grow option is not enabled.
The sidebar will remain at 200px wide until all columns linearize.
Section User Class
You can assign an optional User Class to the hmy-section DIV that surrounds the currently selected column. You can also add multiple classes . To do so, enter each class name separated by a space. User classes are one of the most powerful features in Harmony. It allows you full freedom to customize individual sections beyond the options in the UI. Stylistically, there is absolutely nothing you cannot do.
Overflow Hidden
By their nature, Flexbox elements do not report element width to the DOM in the same manner as other elements. Some widgets require that the Flex container they are placed inside of have overflow set to hidden. When this need arises, simply select the Harmony Section containing your widget and enable the Overflow Hidden option. PVII widgets that need this setting include Tab Panel Magic 3, Headline Scroller, and Image Gallery Magic 2.
Content Align
Align your column content left, right, or center.
Vertical Center
Vertically center your content.
Note: Vertical Center will only be apparent when adjacent columns are taller.
No Padding
Selecting this option will remove all padding inside your column. A typical use for this option is where your column will contain a navigation bar or an Accordion that will look best if it fills the column box in its entirety.
Borders
Configure your column(s) with borders.
Tip: Border color is determined by the text color set for the column,
Rounded
Add rounded corners to your column.
Tip: Rounded corners should only be added to a column when that column's width basis is set to 100% or if the Box Separation option is set (discussed below).
Color Scheme
For your convenience, we've included 20 color schemes that can be assigned to your columns or to the outer Harmony structure. The color choices are listed below:
None
Gray
Black
White
Green
Mint
Blue
Red
Skyblue
Silver
Purple
Lavender
Beige
Wine
Forest
Mist
Rust
Silverblue
Gold
Orange
The above color chart, as well as all other examples on this page, are actual Harmony layouts , made with the Harmony interface.
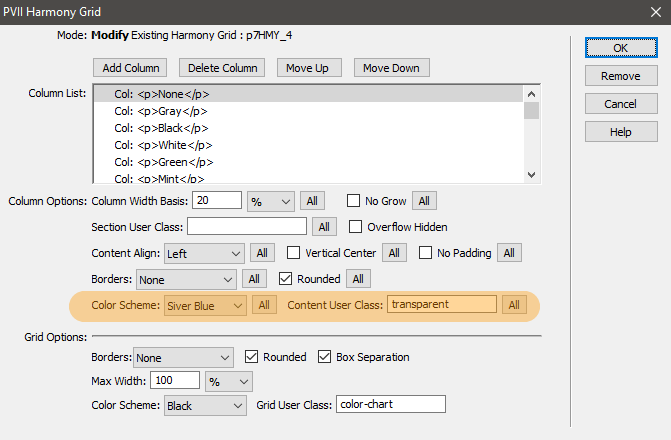
How About Transparency?
If you want your color scheme's background to be semi-transparent, simply add a user class of transparent to the color you assigned the color to (or the outer wrapper if you've assigned the color there).
Content User Class
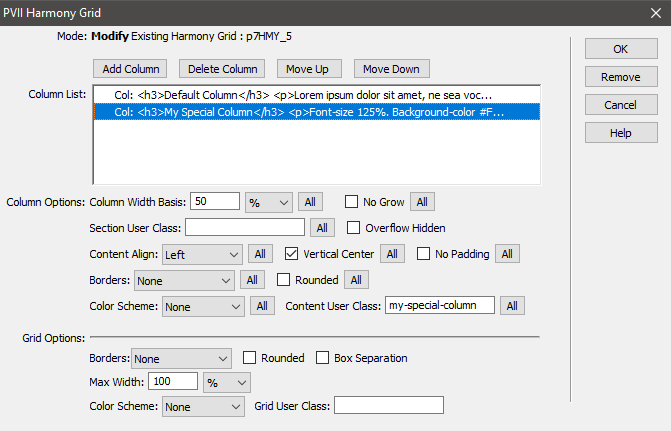
You can assign an optional User Class to the selected column. You can also add multiple classes . To do so, enter each class name separated by a space. User classes are one of the most powerful features in Harmony. It allows you full freedom to customize individual columns beyond the options in the UI. Stylistically, there is absolutely nothing you cannot do. For instance, let's say you have a two column layout and you want one column to have larger text than your other columns, and you want to assign a background color that is not included in our color scheme option. Here's what you'd do...
Create a new CSS file
To preserve the integrity of your default Harmony style sheet, you should perform edits and customizations in a separate, user-defined CSS file. That way, if we issue an update with new features that rely on CSS, you'll be able to replace the default Harmony style sheet without losing your customizations. To create a new CSS file:
- In your Files Panel, right-click the p7hmy folder
- Choose New File
- Name the file my-custom-styles.css (or a name of your choice)
- Link the file to your page, pages, or if using a DW Template, to the master DWT file
Make sure you link the file so that it comes after the default Harmony CSS file link in the head of your document:
<link href="p7hmy/p7HMY-01.css" rel="stylesheet" type="text/css" media="all">

        <link href="p7hmy/my-custom-styles.css" rel="stylesheet" type="text/css" media="all">
In your new style sheet, create a blank line and type in the following CSS class, surrounded by a comment block identifying this section of your style sheet as being devoted to user classes:
/*
******************
My User Classes
******************
*/
.my-special-column {
font-size: 125%;
background-color: #F69;
}
Here's what the UI would look like:
Note: User Class names must never contain the word harmony or the acronym hmy.
Here's what it looks like when my-special-column is assigned to your column:
Default Column
Lorem ipsum dolor sit amet, ne sea vocent scripta abhorreant, facilisi explicari mel ne, ut quo vide ridens. Mei ex quodsi inciderint, quo ad quas deleniti definitionem, vis no wisi graecis offendit. Ius ut everti detraxit expetenda, meis civibus consectetuer ea usu. Ad qui option facilisis consequuntur, pro omnis aliquip vulputate te.
My Special Column
Font-size 125%. Background-color #F69 (pink). This column is also set to vertical center.
Grid Options
These options apply to the entire Harmony instance.

Borders
Assign borders to any or all sides of the outer wrapper.
Rounded
Round the corners of the outer wrapper.
Box Separation
This option is unique in that it is assigned to the outer wrapper, while affecting each of the columns inside the structure. Each column in your Harmony instance will have space around it on all sides. Print designers would call this a gutter.
Note: The color chart above uses the Box Separation option.
Max Width
If you set a max width on your Harmony instance, it will center horizontally on your page and never exceed the max width setting.
Color Scheme
The same color schemes available for assignment on your columns can also be assigned to the outer wrapper.
Grid User Class
You can assign an optional User Class to the entire Harmony instance. You can also add multiple classes . To do so, enter each class name separated by a space. User classes are one of the most powerful features in Harmony. It allows you full freedom to customize your layout beyond the options in the UI. Stylistically, there is absolutely nothing you cannot do. For instance, let's say you want to display a matting around your columns. Here's what you'd do:
Let's add a new class (grid-matte) to the one created in the Content User Class section before:
/*
******************
My User Classes
******************
*/
.my-special-column {
font-size: 125%;
background-color: #F69;
}
.
grid-matte {
padding: 10px;
}
Here's how the UI looks:
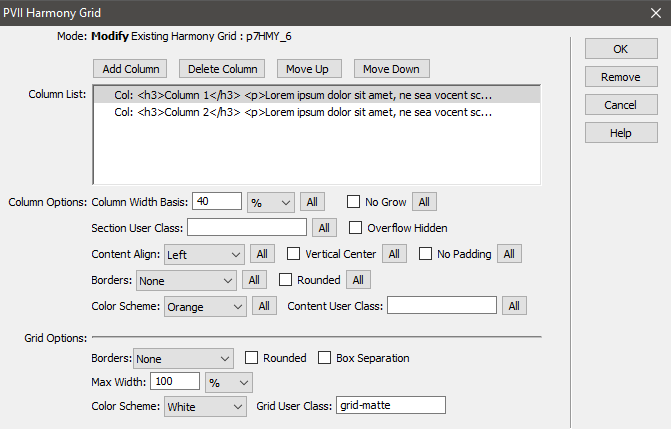
Here's how the actual structure looks:
Column 1
Lorem ipsum dolor sit amet, ne sea vocent scripta abhorreant.
Column 2
Lorem ipsum dolor sit amet, ne sea vocent scripta abhorreant, facilisi explicari mel ne, ut quo vide ridens. Mei ex quodsi inciderint, quo ad quas deleniti definitionem.
Note: User Class names must never contain the word harmony or the acronym hmy.
Harmony vs. Layout Builder Magic
The obvious difference is that LBM uses CSS floats to render rows and columns. Harmony uses the newer CSS Flexbox specification, which is a more modern technique, and one that is now ready for widespread use. Harmony is an easier tool to use, but there is absolutely no reason to change existing LBM pages. In fact, you can use Harmony inside LBM pages to create quick and elaborate column structures. Going forward, you should consider Harmony for new pages for its ease of use, simplicity, and the natural flexibility attributes inherent in the Flexbox specification.
Adding I-Frame-Based Videos
To add a YouTube or similar iframe-based video to your page, first create a video wrapper DIV and assign it a class of hmy-video-wrapper. Place your video code inside the wrapper:
<div class="hmy-video-wrapper">

          video code goes here

          </div>
Harmony is made for Dreamweaver Templates
After you create your page, there is an important decision you should make. If you wish to manage site-wide repeating content, such as mastheads, logos, navigation menus, and footers, you need to use some type of site-wide management technique. The most popular method for Dreamweaver users is DWT (Dreamweaver Template).
To convert your page to a Dreamweaver template:
After creating your page, edit the content that will be common to all the pages in your site. Finalize your logo and masthead, your menu, and your footer. Now you're ready to make a Template.
Choose File > Save As Template
Name your page and click Save
Leave the DWT file open, as you'll be doing some work in it.
Create an Editable Region for page content
Switch to Code View in your DWT file.
Until you create an editable content region, all content on your page will be locked. You want your logo to be locked, and your menu, and your footer. But you will certainly need to have your page's main content areas be editable so that you can add relevant content to each of the pages in your site.
Here is base code for a Vibrations page made with Harmony after being converted to a Template:
<!-- TemplateBeginEditable name="head" -->

          <!-- TemplateEndEditable -->

          </head>
<body class="p7vibes-01">

          <div id="p7HMY_1" class="p7HMY hmy-noscript masthead" data-hmy-max-width="100,%">

          <div class="hmy-section" data-hmy-basis="100,%,1">

          <div class="hmy-content-wrapper">

          <div class="hmy-content hmy-left">

          <h1>PVII Vibrations: <span class="tagline">Performance Tuning and Engineering</span></h1>

          </div>

          </div>

          </div>

          </div>

          <div id="p7HMY_2" class="p7HMY hmy-box-separation hmy-noscript" data-hmy-max-width="100,%">

          <div class="hmy-section" data-hmy-basis="25,%,1">

          <div class="hmy-content-wrapper hmy-vertical-center hmy-content-rounded hmy-color-content-rust">

          <div class="hmy-content hmy-left">

          <h2><a href="#" class="text-link">Current Offers...</a></h2>

          <p>Explore new systems, special bundles, and price savings.</p>
In each Vibrations layout, there are 3 separate Harmony instances. Each instance's root DIV is assigned an ID: p7HMY_1 (masthead), p7HMY_2 (content), and p7HMY_3 (footer).
The content area is always going to be p7HMY_2, and that's the DIV we want to wrap inside of an editable region.
Place your cursor inside the p7HMY_2 DIV and click the associated tag on the Tag Selector bar that runs along the bottom of your Code window (just above the property inspector). The entire code for p7HMY_2 will highlight.
With the p7HMY_2 code still highlighted, choose Insert > Template Objects > Editable Region
Enter a name and click OK. Your Template is now ready for saving.
Save your DWT file and close it.
Creating a child page based on your new template
Now that your template is saved, you can easily create one or more child pages. To do so...
Choose File > New
The New Document Window will open.
Click Create.
The generated page will open. You should save it in your defined site before proceeding.
Note: Make sure you save the page within your defined Dreamweaver site, before beginning to edit it.
As you move your cursor around the page, you'll notice that only the content inside the second Harmony instance is editable.
Powered by Harmony
Use the methods described above and a single Dreamweaver template can drive your entire site—a site where each and every child page can have a completely different structure and look. All you need to do is place your cursor anywhere inside the editable region and open the Harmony interface, where you can then delete columns, add columns, change their width, and so very much more.
Editing locked areas inside your DWT file
You will not be able to edit or delete any content inside the masthead, footer, or menu. Those areas can only be edited inside your DWT file. Simply open your DWT file, make your changes (a revised logo, a new menu item to access a new page, a new year for your footer's copyright notice). When you save the DWT file, Dreamweaver will ask if you want to update pages based on the template.
Template Notes
The most important thing to consider is that editable regions must always be created one of two ways:
1. Between Harmony Instances
2. Inside Harmony content areas
Editable regions must never be places beween Harmony structural DIVs.
Support Options
Before making a support inquiry, please be certain to have read the documentation that came with your product. Please include your Order Number, Dreamweaver version, as well as your computer operating system type in all support correspondence.
Support Forum
PVII maintains a Web Forum community. Go Direct to the Web Forum
E-Mail and Phone Support
E-Mail: support@projectseven.com
Phone: (336) 374-4611
Phone hours are 9:00am - 5:00pm Eastern Time U.S.