Snowgirl
Open your Dreamcatcher.png file if it isn't still open. Hide both the Background and Dome layers. Create a new layer and name it Snowgirl. Click on the title bar of your new layer to activate it. Import the Snowgirl.png onto the new layer.
The first thing you'll notice is that the image is way too large. It's that way on purpose to make it easier to take care of the second thing you might have noticed. Her awful lipstick color. Zoom in on the young woman's mouth to 200%. We'll start retouching the image by using the Rubber Stamp tool to get rid of the snow blobs on her lips.
![]()
There is a lot of confusion about what the Rubber Stamp tool does and how it works. The Rubber Stamp tool clones the pixels in one area of a bitmap so you can stamp them onto another part of the bitmap. This feature is especially useful when you want to fix a scratched photograph, and remove dust or other flaws.
- Select the Rubber Stamp tool and set the size for 6 pixels, the edge to 1, and check Source aligned
- Source aligned means the pixels are copied from the area we designate as the source.
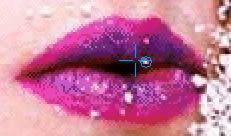
- Click just to the left of the lower, light colored blob on Snowgirl's upper lip
The cursor changes to a crosshair that shows you the location of the copied pixels. As soon as you move your mouse, a 6 pixel circle appears next to the crosshair. This circle is what you use to target the area where you want to deposit the pixels you copied.
- Move the circle cursor over the blob and click. Voila! The blob is gone
- Move the cursor to the right of the remaining blob on the upper lip
- Press Alt and click (Option-click on Macintosh) to choose the new source
- Center the circle over the blob and click
- Remove the blobs from the lower lip
You might want to do the largest blob in two or three steps. Take your time with this. If you make a mistake, simply undo your steps.
Now that we've finished deblobbing the model's lips, let's change that ghastly lip color.
- Select the Polygon Lasso tool and stitch a marquee around the edge of the lips
- Choose Filters > Adjust Color > Levels from the main toolbar
- Select the middle of the three eyedroppers on the right side of the Levels dialog box
The middle dropper enables you to set the midlevel color of the selection.
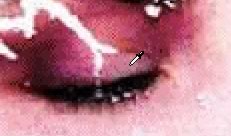
- Click the eyedropper in the light pink color on the Snowgirl's left eyelid (your left - her right)
That got rid of the blue color in the middle of her lips and brightened the color. Next we'll change the color to a more natural looking rose.
- Choose Filters > Adjust Color > Hue/Saturation from the main toolbar
- Reduce saturation and lighten
- Move the Hue slider back and forth until the hue changes to an acceptable one
The settings I used were 19 for Hue, -32 for Saturation, and 21 for lightness. Use those as a starting point if you like. They'll probably need adjusting because the midlevel color of the lips from the previous step will be slightly different in your image.
If you are feeling confident in your newly earned Rubber Stamp skills, stretch them a bit farther by removing the snow blobs along the ridge of the Snowgirl's nose.
Another refinement we'll make to the image is to lighten the area under the Snowgirl's eye. We'll use the Dodge tool for this.
- Click and hold on the Blur tool to find the Dodge tool and select it (he Dodge tool is the one that looks like a cardboard looking glass)
Enter the following settings for the Dodge tool in the Property inspector:
- Brush size - 32
- Edge - 100
- Shape - round
- Range - midtones (leaves the neighboring highlight and shadow pixels alone)
- Exposure - 25
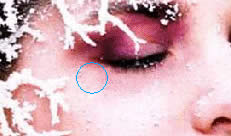
Rather than dragging the Dodge tool as the Fireworks help files suggest, lighten the area with a series of quick mouse clicks. This technique gives you much more control over the results. As you become more confident with the Dodge tool you'll be able to adjust the settings and try other kinds of strokes.
The last adjustment we need to perform on the Snowgirl image before blending the three images together is to reduce its size. If the image isn't selected, click on it and:
- Choose Modify > Transform > Numeric Transform
- Choose Scale 50%. Leave both Scale Attributes and Constrain Proportions checked
- Unhide the Background and Dome layers
- Move the Snowgirl's head to the middle of the dome, then hide the Snowgirl image.
Next: Putting it all together