Video Background Magic (VBM)
PVII Video Background Magic User Guide
VBM gives you the ability to add video backgrounds to any element on your page. Of course, since this is a PVII extension, you can orchestrate your animations from within a graphical user interface that installs and runs inside Dreamweaver.
Browser/Device Support
VBM uses the HTML5 video tag, which is supported in all modern web browsers, as well as modern iPhones, Android phones, and tablets. Older browsers, such as IE9, will display a placeholder image of your choosing.
Installing VBM
Extension installer files come in 2 formats: MXP and ZXP. MXPs are supported by Extension Manager versions MX, MX2004, 8, CS3, CS4, CS5, CS5.5 and CS6. ZXP is supported by versions CS5.5 and higher. Version CC and higher have dropped support for the MXP format. To continue to support all Adobe customers, regardless of version, we include both the classic MXP and the new ZXP versions.
Dreamweaver CC 2015 (and higher) Extension Installation Information
As of CC 2015, Adobe has ceased to support its own Extension Manager. Use the PVII Extension Manager for Adobe Creative Cloud...
Dreamweaver CC 2017 Advisory
Creative Cloud Users: PVII Extensions work with all Creative Cloud versions—including CC 2017. You do need to use the PVII Extension Manager as Adobe has dropped support for its own Extension Manager. The PVII Extension Manager is free. Download it here. Also note that Adobe has published a list of bugs in CC 2017. More about CC 2017 bugs.
PVII Extension Manager for Adobe CC
( Windows and Mac)
Accessing VBM
There are several ways to access the VBM interface, but before you open the UI, you must select the element to which you want to assign a VBM instance.
Selecting an Element
Before attempting to open the VBM UI, make sure you select the DIV or other element you ish to assign the background to. VBM can be assigned to any element on your page, including the body tag. If you have trouble selecting the right element, note that VBM works in code view, as well as design view.
Opening the UI
Select an element on your page and choose one of the 3 methods listed below to open the VBM interface:
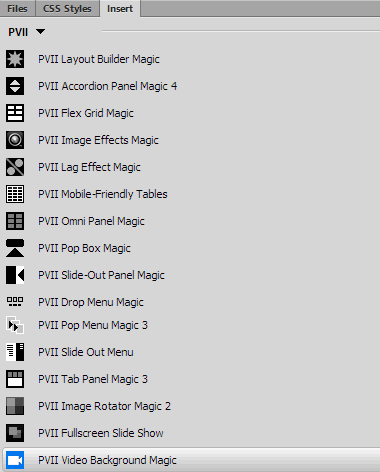
1. Insert Bar
Switch to the PVII category. VBM is the last one in the screen capture below
![]()
2. Insert Panel
Switch to the PVII category. VBM is the last one in the screen capture below
3. Insert Menu
Choose Insert > Studio VII > Video Background Magic by PVII
The VBM UI will open.
VBM Interface: Options & Settings
The VBM interface makes customizing your background easy!
The VBM Interface
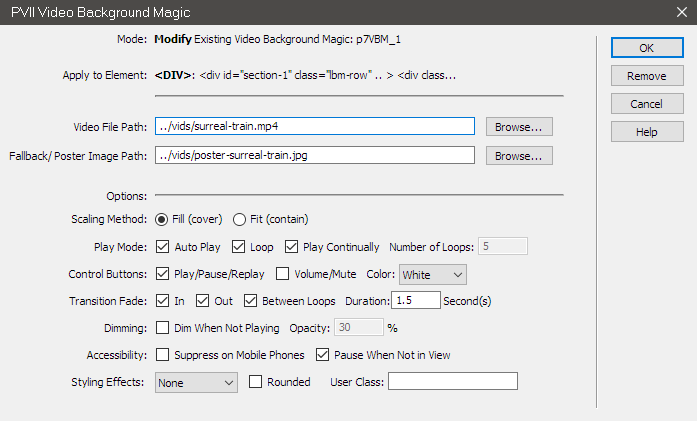
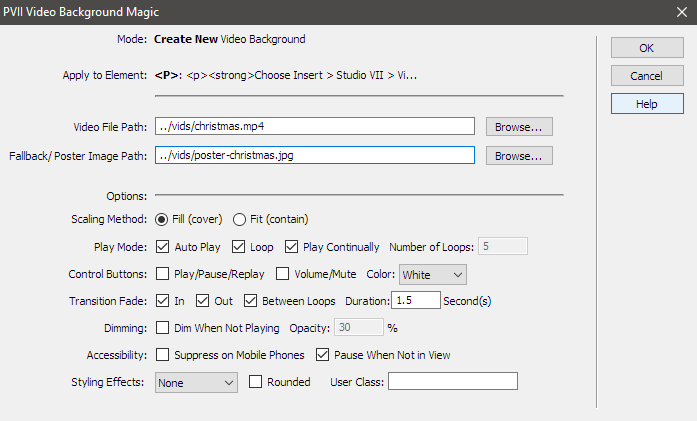
The VBM UI allows you to easily define and configure VBM instances, one at a time, and once configured, the UI can be used to modify (edit) each instance as often as you like. .
Mode
If you are creating a new VBM effect, the mode will be Create. If editing an existing effect, the mode will be Modify.
Apply to Element
The selected element (tag) that the VBM instance is (or will be) assigned to. Make sure this is the element you want. If not, click Cancel and then select the relevant tag using the Tag Selector Bar. Tags can be selected in either Code or Design View.
Video File Path
Enter or browse to a source video file. In order to natively support all modern browsers, the video file must be MP4 format.
Fallback/Poster Image Path
One of the allowable attributes on the HTML5 video tag is poster. The poster is an image that displays if the video does not load or if the browser/device does not support HTML5 video.
Options

Scaling Method
Choose between Fill (default) or Fit
Fill
The Fill method will cause the video to fill the entire element to which it is assigned. The VBM script will zoom the video in until all 4 sides completely fill the assigned element. This is the default method and will usually provide the best results from a design standpoint.
Fit
The Fit method will fill the entire width of the assigned element, but the video will not be zoomed. In some cases, you might want this effect. For example, if your video is alpha transparent (a feature in some advanced video editors), this method might be desirable. Note that depending on your video's natural aspect ratio, and the amount of content in the target element, this method will sometimes result in the video being markedly shorter than the target element.
Play Mode
The available play modes are self-explanatory. Choose Auto Play if you want your video to start automatically. Select Loop, Play Continually, and Number of Loops to suit.
Control Buttons
The optional control buttons are icons that appear at the top right edge of your video.
Pause/Play/Replay
A single icon that will automatically change states between Play, Pause, and Replay.
Volume/Mute
Select this option if your video has an audio track. According to best practices for usability, all videos will begin muted. The user can then click or tap the Volume/Mute icon to toggle sound on and off.
Color
Choose White, Black, or Inherit for your icon color. If you choose Inherit, your icons will inherit the link color or text color set in your style sheet for your target element.
Transition Fade
VBM allows you to set your video to fade In, Out, and Between Loops, which is a great feature if your video was not designed for seamless looping. You can also set the fade Duration. The higher the number, the slower the effect. The Duration option applies to all 3 types of fades (In, Out, and Between Loops).
Dimming
Dim When Not Playing
When the video ends, or is paused, it will dim (fade) out to the level of Opacity you set.
Accessibility
Suppress on Mobile Devices
With this option enabled, your video will not display on phones. Instead, the Poster (placeholder) image will show. If you have not set a Poster image, then nothing will show.
Pause When Not in View
This option (on by default) will automatically pause any playing video that is not in the visible viewport.
Styling Effects
Choose from the following effects...
In the drop down list: Grayscale, Sepia, Blur
The system will assign a CSS filter property to your video.
Rounded
Your video will be assigned a class of vbm-rounded. The default border-radius is 6px. If you want a different radius, you can edit the following CSS rule in your VBM style sheet:
.vbm-rounded,
.vbm-rounded video {
border-radius: 6px;
}
User Class
If you want to customize your video, you can assign your own custom User Class. Simply enter the class name in the box. The only restriction is that your name cannot include the character string "vbm". For instance, if you set a User Class of vid-02, the class will be assigned to the video wrapper, which will look something like this:
<div id="p7VBM_2" class="p7VBM vbm-wrapper vbm-noscript vbm-grayscale vid-02">
<video autoplay muted playsinline type="video/mp4" poster="../vids/poster-pulse.jpg">
<source src="../vids/pulse.mp4">
</video>
You can then build your own CSS classes for the video wrapper:
.vbm-wrapper.vid-02 {
background-color: teal;
}
Or the video itself:
.vbm-wrapper.vid-02 video {
opacity: 0.5;
}
Command Buttons
There are 3 buttons always present in the UI:
OK
Click OK to add your new VBM instance to your page, or to execute your edits when modifying an existing VBM instance.
Cancel
Click Cancel to terminate your UI session. Nothing will be created or modified.
Help
Click the Help button at any time to open this user guide.
If you are editing an existing VBM instance, a fourth button will appear:
Remove
Click the Remove button to remove the current VBM instance. If it is the only VBM instance on your page, the link to the VBM JavaScript and CSS files will also be removed.
Control Actions
VBM comes with a suite of Control Behaviors.
Accessing the Control Actions
The Control Actions are accessed from Dreamweaver Behaviors panel. If you do not know where this panel is, select Window > Behaviors.
Opening the UI
Select a trigger element, such as a text link or an image. Then, in the Behaviors panel, click the plus (+) icon to open the menu. Choose:
Studio VII > Video Background Magic

There are two types of classes to choose from: Control Actions or Control All.
Control Actions
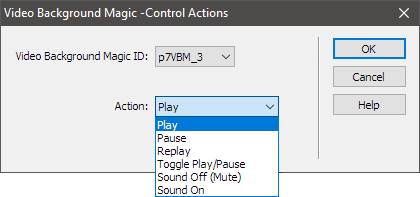
Select an instance of VBM by selecting its Video Background Magic ID, then Choose your Action from the Action list.
Control All
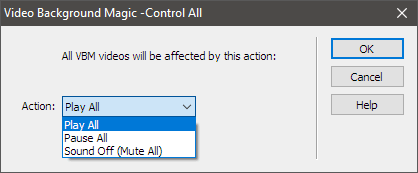
The Control All actions are powerful tools that enable you to interact programmatically with all VBM videos on your page. These actions are particularly valuable when deploying multiple VBM instances in a panel widget, such as Omni Panel Magic, or inside a hidden element on your page.
OnClick or OnMouseDown
When you assign an action to a link or image, Dreamweaver assigns the action onClick, by default. For simple text or image links, this is fine. If you are assigning them to the tabs in an Tab Panel widget, for example, you should change the action to onmousedown.
Assigning Multiple Actions
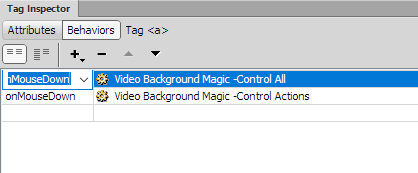
You can assign multiple actions to single link or image. This is extremely useful when showing video backgrounds inside panel widgets. This will allow you, with a single mouse or touch action on the trigger, to first pause any other playing videos, and then play the one associated with the relevant panel. Just make sure that the Control All action comes first.
You can see this technique in action on the VBM Example 2 page...
Tips
Limit the total size and length of your video
You should limit the length of your videos to 30-40 seconds at the most. Design them to loop seamlessly or utilize the Fade on Loop option that comes with VBM.
Avoid excessive movement
Excessive motion attracts focus to the video and takes it away from the words. Background videos should be subtle and smooth. If you do not have video editing capabilities, you should purchase your videos from a reputable source such as Shutterstock. If you'd like to explore free video possibilities, the source for our video might be just what the doctor ordered: Pixabay
Offer a pause button
No matter how great and subtle you think your background video is, there will be people who'd rather pause it. Whether it be because it's distracting them, they feel it's slowing down their computer, or they don't expect it to pause by itself.
Publishing
When publishing to your server, make sure to upload the p7lvbm folder. The folder is created in the same folder as the page you are working on, and contains the VBM JavaScript file.
Support Options
Before making a support inquiry, please be certain to have read the documentation that came with your product. Please include your Order Number, Dreamweaver version, as well as your computer operating system type in all support correspondence.
Support Forum
PVII maintains a Web Forum community. Go Direct to the Web Forum
E-Mail and Phone Support
E-Mail: support@projectseven.com
Phone: (336) 374-4611
Phone hours are 9:00am - 5:00pm Eastern Time U.S.