Layout Builder Components User Guide
Installing LBM Components
Extension installer files come in 2 formats: MXP and ZXP. MXPs are supported by Extension Manager versions MX, MX2004, 8, CS3, CS4, CS5, CS5.5 and CS6. ZXP is supported by versions CS5.5 and higher. Version CC and higher have dropped support for the MXP format. To continue to support all Adobe customers, regardless of version, we include both the classic MXP and the new ZXP versions.
Dreamweaver CC 2015 (and higher) Extension Installation Information
As of CC 2015, Adobe has ceased to support its own Extension Manager. Use the PVII Extension Manager for Adobe Creative Cloud...
PVII Extension Manager for Adobe CC
( Windows and Mac)
Download and Install Instructions
Accessing the Components
There are four ways to access LBM Component interfaces. Choose the one most suitable to your workflow. When you open an interface, the system will detect the appropriate mode (Insert or Modify).
1. Insert Bar
![]()
2. Insert Panel
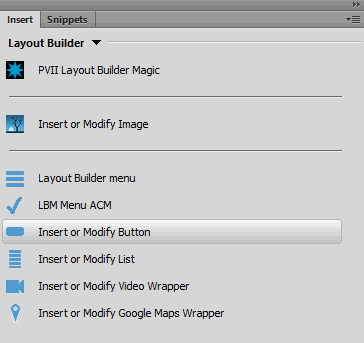
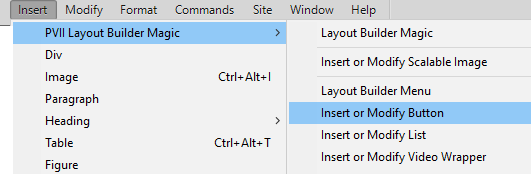
3. Insert Menu
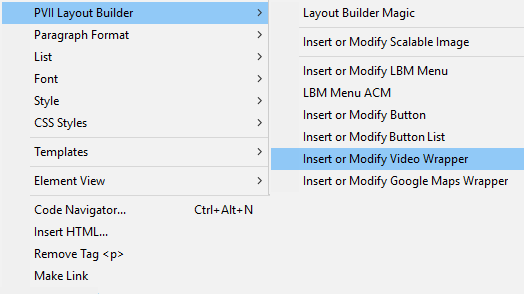
4. Right-Click
LBM Responsive Video Wrapper
Instantly insert or modify a responsive video at any location on your page.
Click the Insert or Modify Video Wrapper icon ![]() in the LBM section of your Insert Bar, Insert Panel, Insert menu, or right-click menu to open the UI.
in the LBM section of your Insert Bar, Insert Panel, Insert menu, or right-click menu to open the UI.
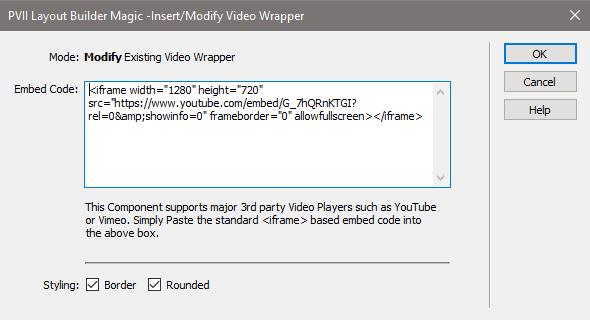
The Video Wrapper component works with major third-part video services such as YouTube and Vimeo, or others that use iframe-based embed code. Go to your video service's web page and copy the embed code for the video you wish to place in your page.
Paste the embed code inside the Embed Code box.
Set your Styling options.
Click OK.
LBM Responsive Google Map Wrapper
Instantly insert or modify a responsive Google map at any location on your page.
Click the Insert or Modify Google Map Wrapper icon ![]() in the LBM section of your Insert Bar, Insert Panel, Insert menu, or right-click menu to open the UI.
in the LBM section of your Insert Bar, Insert Panel, Insert menu, or right-click menu to open the UI.
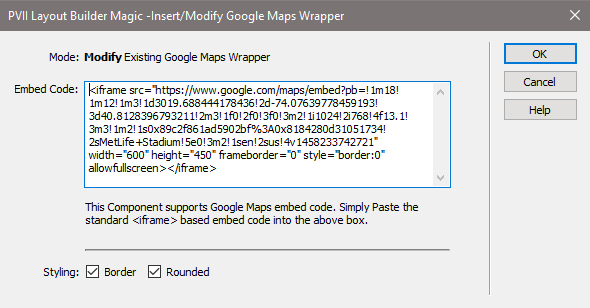
Go to the Google Map web page and copy the embed code for the map you wish to place in your page.
Paste the embed code inside the Embed Code box.
Set your Styling options.
Click OK.
LBM Button Maker
Instantly create or modify inlne CSS buttons at any location on your page. You need to make a simple decision before opening the UI. If you want to convert existing text on your page into an LBM Button, select that text before opeing the UI. If you want to place a button and set the text inside the Button UI, simply place our cursor where you want the button to appear. Now you can open the UI...
Click the Insert or Modify Button icon ![]() in the LBM section of your Insert Bar, Insert Panel, Insert menu, or right-click menu to open the UI.
in the LBM section of your Insert Bar, Insert Panel, Insert menu, or right-click menu to open the UI.
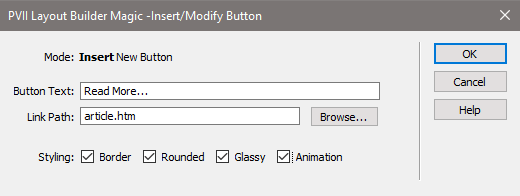
If you selected existing text before before opening the UI, it will already be inside the Button Text box. If not, there will be an editable placeholder.
Set the Link Path to the URL of your choice. You can type it in directly or use the Browse... button..
Select your Styling options.
Click OK..
Button Maker CSS Edits
Buttons are extremely easy to edit. Please do so directly in the p7LBM-Cmpnt.css file, whic can be found inside your p7lbm folder. Do not use Dreamweaver's CSS editing panels or Designer, as they do not adequately support the advanced CSS we use and may corrupt your code. The editable rules you'll need to edit colors and effects will be found near the top of the file, clearly commented. The first 2 rules in the editable section apply to the Button Maker:
****************************
LBM Button Component
Editable Styles
****************************
a.lbm-btn {
background-color: rgb(180,180,160);
color: #000;
padding: 10px 15px;
}
a.lbm-btn:hover {
background-color: rgb(100,100,80);
color: #FFF;
border-color: inherit;
}
LBM Button List Maker
Instantly create or modify CSS button lists at any location on your page.
Click the Insert or Modify List icon ![]() in the LBM section of your Insert Bar, Insert Panel, Insert menu, or right-click menu to open the UI.
in the LBM section of your Insert Bar, Insert Panel, Insert menu, or right-click menu to open the UI.
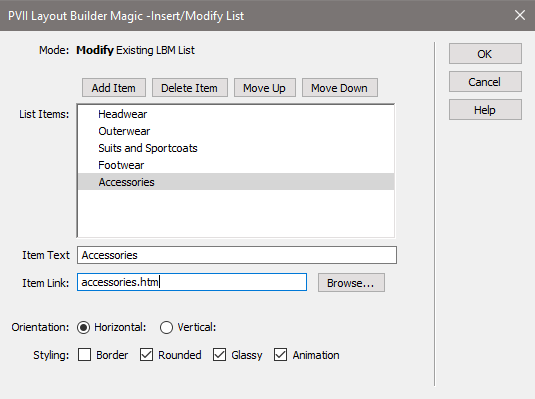
Use the Add, Delete Item, Move Up, and Move Down buttons to add, delete, and reorder buttons.
Use the Item Text box to enter or edit the text for each of your buttons.
Use the Item Link box or the Browse... button to set the URL path for each of your buttons.
Set your list's Orientation to either Horizontal or Vertical.
Set your Styling options.
Click OK.
Button Maker CSS Edits
Buttons are extremely easy to edit. Please do so directly in the p7LBM-Cmpnt.css file, whic can be found inside your p7lbm folder. Do not use Dreamweaver's CSS editing panels or Designer, as they do not adequately support the advanced CSS we use and may corrupt your code. The editable rules you'll need to edit colors and effects will be found near the top of the file, clearly commented. The last 4 rules in the editable section apply to the Button List Maker:
****************************
LBM Button Component
Editable Styles
****************************
.lbm-btn-list-vert a {
background-color: rgb(180,180,160);
color: #000;
padding: 10px 15px;
}
.lbm-btn-list-vert a:hover {
background-color: rgb(100,100,80);
color: #FFF;
border-color: inherit;
}
.lbm-btn-list-horiz a {
background-color: rgb(180,180,160);
color: #000;
padding: 10px 15px;
}
.lbm-btn-list-horiz a:hover {
background-color: rgb(100,100,80);
color: #FFF;
border-color: inherit;
}
LBM Menu Builder
The Menu Builder is designed to work in LBM pages only. It provides an easy to customize menu system with the following features:
- Automated UI for creating and editing your menu
- Optional sum-menu level (one per root link) with optional animation
- Fixed on Scroll option
- Support for multiple menus on same page
- Smooth Scroll to Element option
- Traditional horizontal root menu with vertical drop-downs
- Vertical root menu with accordion sub-menus
- Menu alignment option: left, center, or right
- Auto current page highlighting
- Optional rounded corners
- Buttonized or plain text root links
The Menu Builder Interface
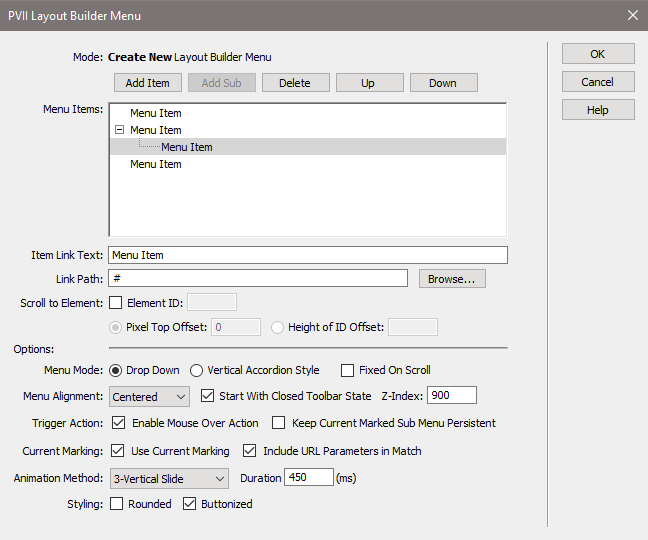
The Interface is pretty self-explanatory. Menu Items are listed in a two-level hierarchy: root to sub-menu item. Use the command buttons atop the list to Add Items, Add Subs, Delete items, and move them Up or Down.
With a menu item selected, type into the Item Link Text box to replace our default placeholder text with the text of your actual link.
The Link Path box is used to enter the URL for your links. You can type it directly into the box or you can click the Browse... button to open a file selection window. For root level links that trigger sub-menus, you may keep the null # path.
Scroll to Element
Check this box to enable the automated Scroll to Element support, which will smoothly scroll to ID'd elements anywhere on your page. Simply set the Element ID to the ID of the element you wish to scroll to. If you have a menu (LBM Menu, DMM, or PMM) set to Fixed On Scroll, you can enter the menu's ID in the Height of ID Offset box and your scolled-to element will always come to rest below the menu.
Additional Options
The lower half of the UI lists additional options...
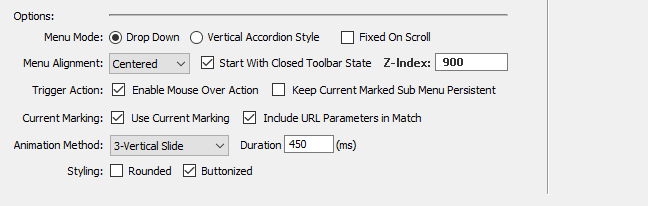
Set any additional options as you wish.
Note: The default z-index of a menu is 900. If you have more than one menu on a page, and you need to assure that one menu's subs open atop another's, set the z-index of the top menu to a higher value. Enter the value in the Z-Idex box.
LBM Menu CSS Customization
The LBM menu is build for easy style customizations. All customizations should be done directly inside the p7LBNAV01.css file, located inside your p7lbnav folder.
Please avoid using Dreamweaver's CSS editing panels. While we are sure that Adobe means well, those panels can easily corrupt your CSS.
The CSS rules needed to customize your menu can be found near the top of the file:
.p7LBNAV {
-webkit-transition: all linear .45s 0s;
transition: all linear .45s 0s;
}
Assign animation effects to the menu.
.p7LBNAV.lbnav-fixed {
background-color: rgb(250,250,230);
background: rgba(250,250,230,0.95);
}
Set background color for the menu when the Fixed On Scroll option is active. The first declaration is for old browsers and is expressed in RGB format. The second is for modern browsers, set with RGBA for semi-transparency.
Padding on List Items
.p7LBNAV ul li {
padding: 6px 0px;
}
Edit padding around menu list items.
.p7LBNAV ul ul li {
padding: 0px 0px;
}
Reset padding to zero for sub-menu list items.
Base Link styles
.p7LBNAV ul a {
-webkit-transition: all linear .35s 0s;
transition: all linear .35s 0s;
}
Assign animation to menu links.
.p7LBNAV ul a {
color: #333;
padding: 10px 18px;
}
Control color and padding on root menu link items.
.p7LBNAV ul a:hover,
.p7LBNAV ul a.open {
background-color: rgb(200,200,180);
color: #000;
}
Control background color and color changes for root menu links on hover.
.p7LBNAV.lbnav-buttonized ul a {
background-color: rgb(160,160,140);
}
Control background color for root menu links when the Buttonized option is active.
.p7LBNAV.lbnav-buttonized ul a.open {
background-color: rgb(100,100,80);
color: #DDD;
}
Control background color and color for root menu trigger links when their relevant sub-menus are open.
.p7LBNAV.lbnav-buttonized ul a:hover {
background-color: rgb(130,130,110);
color: #FFF;
}
Control background color and color changes for root menu links on hover when the Buttonized option is active.
Sub Menu Link Styles
.p7LBNAV ul ul {
background-color: #1F1F1F;
}
Control background color for the entire sub-menu box.
.p7LBNAV ul ul a {
color: #BBB;
padding: 8px 10px;
}
Control background color and color for sub-menu links.
.p7LBNAV ul ul a:hover {
background-color: #444;
color: #FFF;
}
Control background color and color for sub-menu links on hover.
Trigger Link Arrows (links that spawn drop menus)
.p7LBNAV ul a.trig {
background-image: url(img/lbnav_east_black.gif);
}
Control color of arrows that appear next to root links that have sub-menus.
.p7LBNAV ul a.trig:hover, .p7LBNAV ul a.open.trig {
background-image: url(img/lbnav_south_black.gif);
}
Control the color of the arrow that appears when the trigger link is hovered, or when it it's sub-menu is open.
.p7LBNAV.lbnav-buttonized ul a.trig:hover, .p7LBNAV.lbnav-buttonized ul a.open.trig {
background-image: url(img/lbnav_south_white.gif);
}
Control the color of the arrow for trigger links in hover or open state, when the Buttonized option is active.
Current Mark
.p7LBNAV ul a.current_mark {
font-weight: bold;
}
Control Current Marked link. We recommend simply bold, but you may also set a color if you wish.
Toolbar: Responsive mode base for hamburger icon
.p7LBNAV.lbnav-vertical .p7LBNAV-toolbar {
background-color: #222222;
}
Control the background color of the toolbar: the element that houses the hamburger icon when your menu is in smartphone mode.
Text Label Next to Hamburger Icon (Delete text inside quotes for no label)
.p7LBNAV .p7LBNAV-toolbar.closed a:after {
content: "Menu";
}
Control whether a text label appears next to the hamburger icon when the menu is hidden, and what that label says.
.p7LBNAV .p7LBNAV-toolbar.opened a:after {
content: "Menu";
}
Control whether a text label appears next to the hamburger icon when the menu is showing, and what that label says.
LBM Menu Advanced Current Marker
This default Current Marker feature works automatically, without user intervention—but it does rely on matching the current page's URL to a hyperlink contained in the menu. In most cases this will work just fine. However, when the current page is not reflected as a link in the menu, the current marker will not be able to find a match and no marker is applied. Fortunately, the system includes an Advanced Current Marker system to allow you to handle these exceptions so that even pages that do not appear in the menu can have a specified menu link Current Marked.
Note: Use the Advanced Current Marker ONLY when the page does NOT appear as a link within the menu system. In other words, the Advanced Current Marker is designed to handle the exceptions that go beyond the capabilities of the default current marking feature.
Opening the Advanced Current Marker
This feature should only be used on pages that are NOT linked in the menu. To open the interface, click inside the Menu menu that you wish to act on and click the LBM MENU ACM icon: ![]() The Advanced Current Marker user interface will open...
The Advanced Current Marker user interface will open...
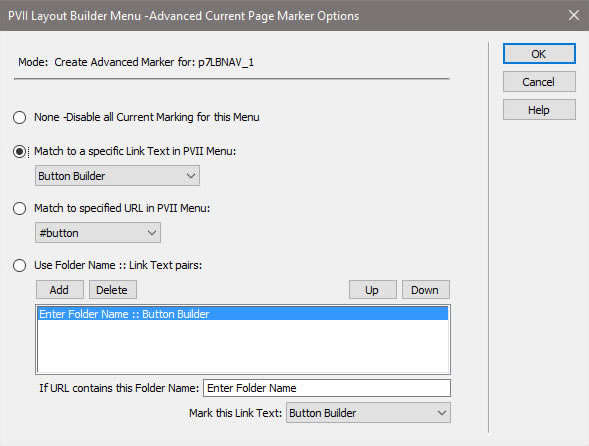
In this example, the interface opens with the URL option selected. The system will detect which option is being used on the page and set the interface accordingly.
The None Option
This option allows you to completely turn off all current marking for this menu on this page only. This is a special override that allows you to have the menu working with current marking turned off on a specific page while it is enabled on other pages.
Text Link Option
This option allows you to select the text of any one of the existing links in your menu as the target for the current marker. When the page loads, the system will look for this text in the menu markup. If a match is found it will apply the current marker to the menu link.
URL Match Option
This option allows you to select the link value (the href) of any one of the existing links in the menu system as the target for the current marker. When the page loads, the system will look for this link value in the menu markup. If a match is found it will apply the current marker to the menu link. The simplest and most direct method for Advanced Current Marking is to use the Text Option. However, there may be occasions where you have duplicate text values in the menu. In these cases, you can use the URL match option to target a specific link for current marking.
Folder / Text Option
This option is designed to allow you to handle large numbers of current marker exceptions and is typically used as a global option applied to every page. Use this option when you have a large number of pages that are not represented in the menu. This option allows you to specify a series of folder names and link text values that the system will use for determining the current marked link in the menu.