PVII Harmony and Dreamweaver Templates The most Powerful Page Building Tools for Dreamweaver
Buy Now ($125) $95 | Harmony Home | More Tutorials
Harmony is made for Dreamweaver Templates
Before you create your Harmony page, there is an important decision you should make. If you wish to manage site-wide repeating content, such as mastheads, logos, navigation menus, and footers, you need to use some type of site-wide management technique. The most popular method for Dreamweaver users is DWT (Dreamweaver Template).
Maximize the Power of Harmony and DWT
To fully leverage the power of Harmony, you should lay out your page with 3 separate instances of Harmony. The first instance should house site-wide masthead elements, such as your logo and main navigation. The second instance, should be reserved for page content. The third instance will be your footer. The masthead and footer will be locked when you create your Dreamweaver template. The page content area will remain editable, enabling you to craft different layout structures for different pages. That is, your home page can have a single column content area, while your about page can have a sidebar, and your product pages can be a grid of product images.
Create your page
Create your page as described above, with three separate instances of Harmony. If you want, we've created a starter page for you. Simply download this file. Unzip it and place starter.htm in your defined Dreamweaver site. The page is configured with 3 Harmony instances, clearly marked so that you can differentiate among them in Design View.
Converting your Harmony page to a Dreamweaver template
After designing your Harmony page, edit the content that will be common to all the pages in your site. In other words, finalize your logo and masthead, your menu, and your footer. Now you're ready to make a Template.
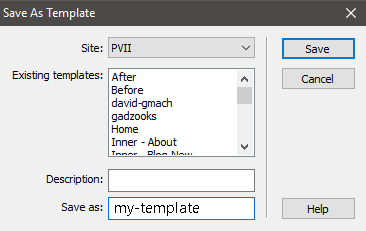
Choose File > Save As Template
Follow the onscreen prompts to save your new template. Name it my-template (or whatever you prefer).
Leave the DWT file open, as you'll be doing some work in it.
Create an Editable Region for page content
Switch to Code View in your DWT file.
Until you create an editable content region, all content on your page will be locked. You want your logo to be locked, and your menu, and your footer. But you will certainly need to have your page's main content areas be editable so that you can add relevant content to each of the pages in your site.
Your page has 3 separate Harmony instances. Each instance's root DIV is assigned an ID: p7HMY_1 (Logo and Navigation), p7HMY_2 (content), and p7HMY_3 (footer).
The content area is always going to be p7HMY_2, and that's the DIV we want to wrap inside of an editable region.
Place your cursor inside the p7HMY_2 DIV and click the associated tag on the Tag Selector bar that runs along the bottom of your Code window (just above the property inspector). The entire code for p7HMY_2 will highlight.
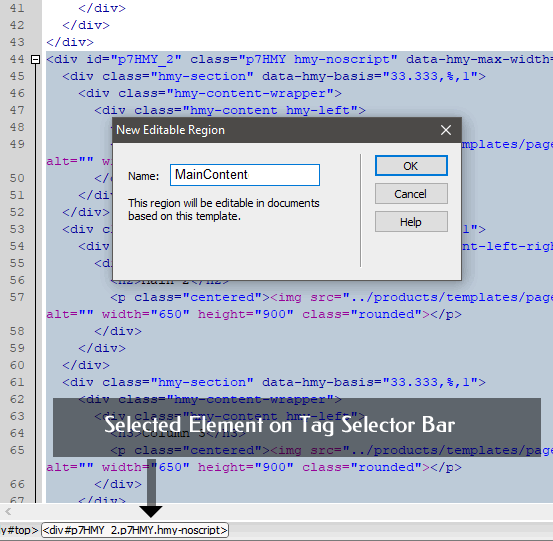
With the p7HMY_2 code still highlighted, choose Insert > Template Objects > Editable Region
Enter a name (MainContent is pretty appropriate) and click OK. Your Template is now ready for saving.
Save your DWT file and close it.
Creating a child page based on your new template
Now that your template is saved, you can easily create one or more child pages. To do so...
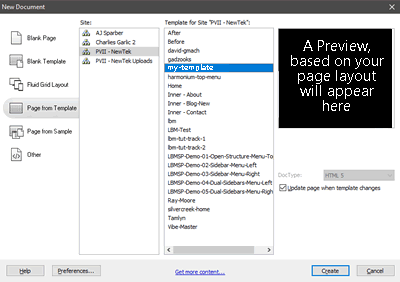
Choose File > New
The New Document Window will open.
Select my-template (or whatever you named the template when you created it).
The generated page will open. You should save it in your defined site before proceeding.
Note: Make sure you save the page within your defined Dreamweaver site, before beginning to edit it.
As you move your cursor around the page, you'll notice that only the content inside the second Harmony instance is editable.
Powered by Harmony
Use the methods described above and a single Dreamweaver template can drive your entire site—a site where each and every child page can have a completely different structure and look. All you need to do is place your cursor anywhere inside the editable region and open the Harmony interface, where you can then delete columns, add columns, change their width, and so very much more.
Editing locked areas inside your DWT file
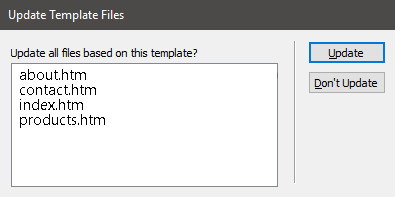
You will not be able to edit or delete any content inside the masthead, footer, or menu. Those areas can only be edited inside your DWT file. Simply open your DWT file, make your changes (a revised logo, a new menu item to access a new page, a new year for your footer's copyright notice). When you save the DWT file, Dreamweaver will ask if you want to update pages based on the template. Click Update to execute all changes.
Key Harmony Features...
Insert and Configure Responsive, Scalable Images
Set Rounded Corners, Borders, and Shadows
Works with Dreamweaver Templates
No coding Required
Optionally Use HTML5 Picture Tag for Advanced Functionality
Serve Separate Images Based on Device
Serve Separate Images Based on Browser Window Width
An Investment in Excellence!
Measured against other tools, PVII Extensions have no equal. We make Dreamweaver better.